Affordable Web Reporting Solution: Part I
Epsilon-Logic Systems (Updated
This article is about how to deploy an enterprise web report solution on your web site hosted by a commercial web hosting service provider. In particular, it will address all of the following issues:
§ Implementing ASP and HTML pages for your web report interfacing forms
§ Implementing the integration of the ELS-Script® report engine with your web pages
§ Installing and registering the report engine component on the web server
§ Uploading your local web site with reports onto your commercial web site on the Internet
§ Further details about the precision Print Preview and Print features
Introduction and Cost Analysis
Most report tools on the current market require a sizable amount of resources on the web server side as well as the client browser side, to be able to barely pass the qualifications and requirements for a practical web reporting solution. We are stating these facts without regards or considerations on the budget requirements of medium sized corporations. In fact, adding this important financial factor makes the web reporting proposed by these alternative report tools almost an impractical matter. In fact, prior to the invention of the ELS-Script® Report Tool, such deployment would have a cost coefficient ranging above $10K, plus the monthly fee for the special web hosting services or the cost of corporation owned bandwidth to Internet. This later monthly expenses would add at least another $2,400 additional yearly cost.
With the introduction of the ELS-Script® Report Tool, this cost factor is reduced to below hundred dollar range. Moreover, currently as we speak, more and more web hosting service companies are adding the ELS-Script's free run-time report engine to their repertoire of components registered into their web server's system registry, and therefore making this report engine available to their customers as an additional service for a few dollars a month. At the moment there are some web hosting companies that will provide such service with web site hosting for less than $40 per month, so that the total yearly cost would be less than $500. This cost covers web site hosting plus an enterprise level web reporting solution that really works, with remarkable practicality and flexibility.
So How Do I Get Started?
To get started with the deployment of such affordable web reporting solution, the first thing you should do is to purchase ELS-Script® Report Tool or download a free trial version of the complete product at the following URL: www.epsilon-logic.net/ELSSDownloads.asp
Well, perhaps this sounds like the fox's tail (i.e. "They asked the fox for a witness it showed its tail and said – Ask my tail"). So to avoid such contortionism we will encourage our readers to download ELSSREDK, the report engine deployment kit consisting of an ASP sample application together with full featured run-time report engine. This package may be downloaded for free at this same download URL: www.epsilon-logic.net/ELSSDownloads.asp. We encourage all web hosting companies to download this later package and using the sample demo make exhaustive tests on their web servers. We believe they will find the ELSRepGenE.DLL report engine a valuable component to deploy on their web servers, making their web hosting services more attractive and competitive. Note that this component is royalty free and may be used for commercial purposes free of charge. In fact, the ELSRepGenE.DLL report engine included with this demo package is the second LCF (Legally & Commercially Free) product that is provided by Epsilon-Logic Systems, the first one being Office-QB 2.0 Standard Free version, a sophisticated query builder tool (check www.dbrsoft.com website for availability).
Getting back to the deployment of our web reporting solution, please download this ELSSREDK package and install (or extract) the product on your system. The installer will create the following important directories with respective files listed below:
ELSSREDK
Engine
![]() ELSRepGenE.DLL
ELSRepGenE.DLL
![]() ELSSRegRepEngine.BAT
ELSSRegRepEngine.BAT
Help
![]() WebReportSolution1.HTM
WebReportSolution1.HTM
![]() EULA.TXT
EULA.TXT
ASPSample
![]() RGOutput.HTM
RGOutput.HTM
![]() DateCtl.JS
DateCtl.JS
![]() Calendar1.HTM
Calendar1.HTM
![]() ParameterDlg.HTM
ParameterDlg.HTM
![]() RGController.ASP
RGController.ASP
![]() ReportViewer.ASP
ReportViewer.ASP
![]() MainPage.HTM
MainPage.HTM
![]() Global.ASA
Global.ASA
![]() RepGen.ASP
RepGen.ASP
Bin
Temp
![]() PrintOnePage.BMP
PrintOnePage.BMP
![]() ZoomIn.BMP
ZoomIn.BMP
![]() ZoomOut.BMP
ZoomOut.BMP
![]() PT.HTM
PT.HTM
![]() PTF.HTM
PTF.HTM
![]() PHookCtl.CAB
PHookCtl.CAB
Database
![]() Northwind.MDB
Northwind.MDB
Images
![]() Stop.BMP
Stop.BMP
![]() Print.BMP
Print.BMP
![]() Run.BMP
Run.BMP
![]() MvNext.BMP
MvNext.BMP
![]() MvLast.BMP
MvLast.BMP
![]() MvPrev.BMP
MvPrev.BMP
![]() MvFirst.BMP
MvFirst.BMP
![]() Northwindlogo.GIF
Northwindlogo.GIF
![]() PrintOnePage.BMP
PrintOnePage.BMP
![]() PrintPreview.BMP
PrintPreview.BMP
![]() Navbtn.GIF
Navbtn.GIF
![]() NorthwindELS2SLogo.JPG
NorthwindELS2SLogo.JPG
![]() GreenDividerBegin.JPG
GreenDividerBegin.JPG
![]() GreenDividerEnd.JPG
GreenDividerEnd.JPG
![]() GreenSquare.BMP
GreenSquare.BMP
![]() GreenBkgrd.GIF
GreenBkgrd.GIF
REPFolder1
![]() AllInvoices.REP
AllInvoices.REP
![]() Invoice.REP
Invoice.REP
![]() OrdersByOrderDate.REP
OrdersByOrderDate.REP
![]() OrdersByDateRange.REP
OrdersByDateRange.REP
Image
![]() Beagle.GIF
Beagle.GIF
![]() Northwindlogo.BMP
Northwindlogo.BMP
![]() NWNamelogo.BMP
NWNamelogo.BMP
![]() NWPictureLogo.BMP
NWPictureLogo.BMP
Include
![]() Styles.CSS
Styles.CSS
![]() Default.CSS
Default.CSS
REPFolder2
![]() OrdersByOrderID.REP
OrdersByOrderID.REP
![]() SalesSumChart.REP
SalesSumChart.REP
Image
![]() Pixel.GIF
Pixel.GIF
Include
![]() Styles.CSS
Styles.CSS
![]() Default.CSS
Default.CSS
In addition to these subdirectories and files, the ELSSREDK package contains yet another folder with the name ReportSourceFiles. This later folder contains the original Script++ Report Designer report project and all the ELS source files corresponding to the REP-files in this package. Therefore, if you want to modify the reports in this sample, then you may use these source files.
If you have IIS installed on your system, the installer will try to create a virtual directory on your local web server with the name ASPSample. To perform this same task manually, you may follow the content of next section.
Also, you will need to register the ELSRepGenE.DLL report engine component into your web server system's registry. This may be done by simply running the batch file included in the Engine folder, which also contains the ELSRepGenE.DLL file.
Running the ASP Demo on Your
Local IIS Server
If you have a system with perhaps Windows NT Server, Windows 2000 Server or above, with IIS 5 (or above) installed on it, then you may get a chance to see the server-based ASPSample application running and generating some sample web reports for you. In this way, you may test the power of the ELSRepGenE.DLL report engine and the ELS-Script® technology as a whole.
To start with setting up the ASPSample application on your local IIS, we will assume that you have already registered the ELSRepGenE.DLL into your local server system's registry by either running the batch file ELSSRegRepEngine.BAT or manually. Then from the menu shortcut Start > Programs > Administrative Tools > Internet Services Manager run the Internet Services Manager application (see Figure 1.1 below):
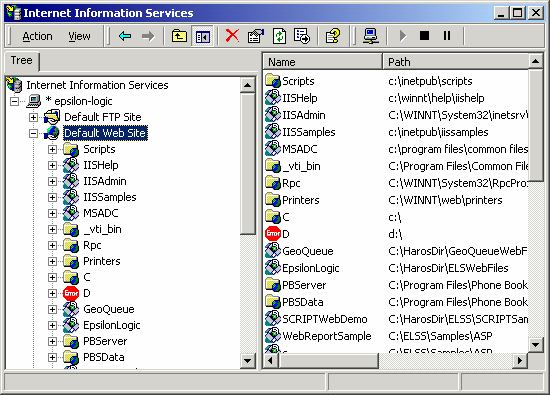
Figure 1.1. Showing the Internet Services Manager
application
To deploy the services of the ASPSample application, we must create a virtual directory under the Default Web Site. Therefore, using the right mouse-button click on the Default Web Site node under your local web sever root node. This will display the popup menu with all the command items that apply to web site nodes. From this menu select New > Virtual Directory item, as shown in Figure 1.2 below:
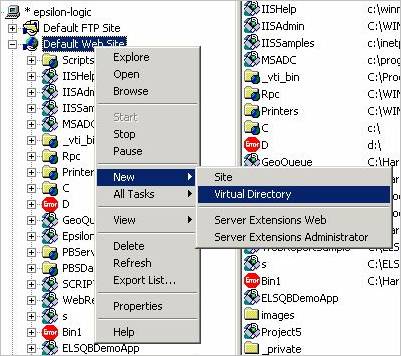
Figure 1.2. Showing the popup menu selection to create virtual directory
This will prompt the Virtual Directory Creation Wizard as shown in Figure 1.3 below:
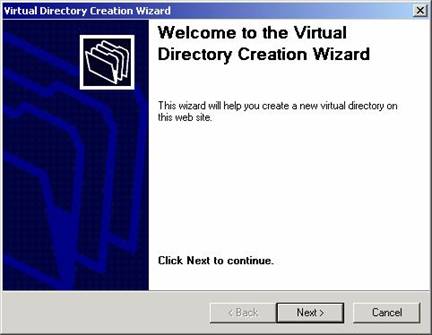
Figure 1.3. Showing the Virtual Directory Creation Wizard dialog
Click the Next button to proceed to the next step of the wizard process, displayed in Figure 1.4 below:
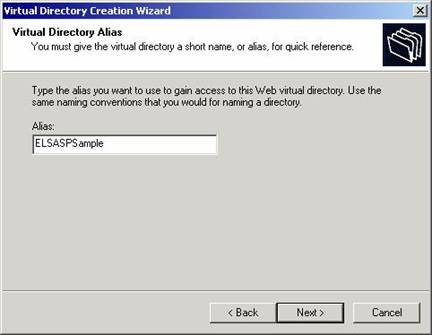
Figure 1.4. Showing the step of the wizard to enter the alias name for the directory
In this second step you must enter an alias name for the virtual directory, for example, enter the name ELSASPSample in the Alias textbox. Clicking Next will get the wizard to another step where you must specify the path of the physical directory that maps to this virtual directory (see Figure 1.5 for details).

Figure 1.5. Showing the step of the wizard to specify the physical directory
In this step, use the Browse button to find the path of the ASPSample subdirectory and then click the Next button. The next step is where you must set the access permissions to the main directory of this virtual directory. We will maintain the default Read and Run scripts privileges, as shown in Figure 1.6 below:
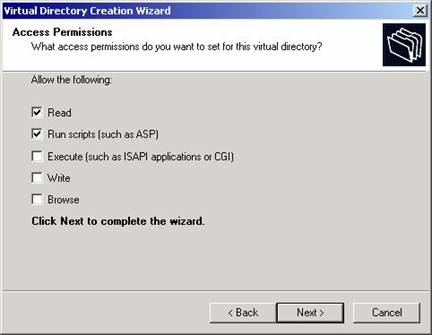
Figure 1.6. Showing the step to set the access permissions for the main directory
Clicking the Next button will get to the final step, which essentially indicates that you have successfully completed the setup of the virtual directory. After clicking the final Finish button, a new folder node with the name ELSASPSample will be added under the Default Web Site node of the Internet Services Manager. This new folder has the same directory and file structure as the mapped physical directory, which is why it is called a virtual directory. In particular, the ELSASPSample node will have the subdirectories Bin, Database, Images and all the files and the subdirectories of the actual physical directory ASPSample.
Observe that we have set the Access Permissions level of the whole ELSASPSample virtual directory to Read and Run scripts, this means that any user will be able to see the content of the files under this directory, as well as run scripts such as ASP, Java and VB included in these files. The Bin subdirectory of this virtual directory actually requires a different access permission setting. In fact, as we will see later in this article that the Temp subdirectory of the Bin directory is used as the storage location where the temporary files of the report generation are created and later automatically destroyed. This means that we need the Write access permission on the Temp subdirectory of the Bin directory. Therefore, using the Windows Explorer browse through to find the physical Temp subdirectory of the Bin directory under the ASPSample directory, and right mouse-button click on the Temp subdirectory to display the popup menu and select the Properties menu item. This will display the Properties dialog as shown in Figure 1.7 below:
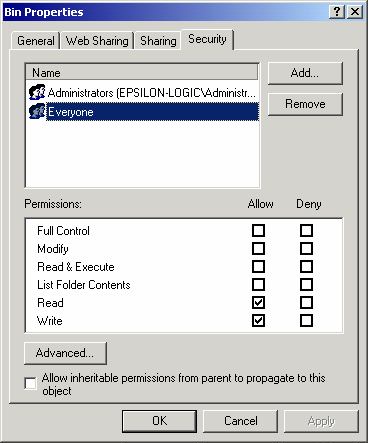
Figure 1.7. Showing the Bin Properties dialog with proper permissions for Everyone
In this dialog first uncheck the Allow inheritable permissions from parent to propagate to this object check-box, with a Copy button answer to the prompting question, and then configure the Permissions for Everyone to Read and Write only, as shown in the figure. Observe that we unchecked the Read & Execute permission, because such a permission combined with Write permission will make the web server less secured. On the other hand, when running the report application without the Write permission for the Temp folder, the report engine will generate an "Access Denied" error. So, in order for the report engine to work properly, we really need to perform this special security configuration step.
In addition to the special security setup on the web server side, for precision printing and print previewing we will need the PHookCtl.CAB uploaded on the client machine. In this ASPSample application, this is done automatically, so that the only thing that needs to be done is to change some Internet Options settings to allow the automatic installation of unsigned ActiveX components. In particular, on the client machine, open the Internet Options dialog (via Tools > Internet Options of the IE browser or the Control Panel). In this options dialog click the Security tab and select the Local Intranet zone. Then click on the Custom Level button to display the Security Settings dialog, as shown in Figure 1.8 below:
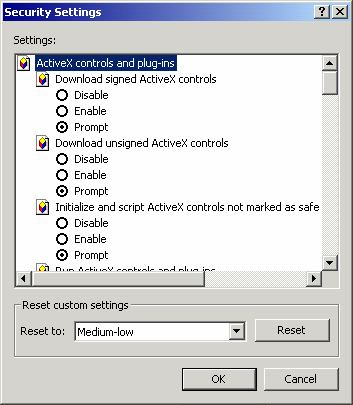
Figure 1.8. Showing the Security Settings dialog
In this dialog, we need to make the Download unsigned ActiveX controls option either Prompt or Enabled. In particular, when setting it to Prompt you must let the Printer Class present in PHookCtl.CAB be installed on the client machine. In addition, the Run ActiveX controls and plug-ins option must also be set to Prompt or Enabled. Again, if this is set to Prompt, then you must answer Yes to the following dialog in Figure 1.9 below:

Figure 1.9. Showing the message whether to allow running ActiveX controls or not
To simplify this security decision for you, we recommend that you configure the Internet Options on the client machine by setting the Download unsigned ActiveX controls option to Prompt, while the Run ActiveX controls and plug-ins option must be set to Enabled. Moreover, if the PHookCtl.CAB is not installed on the client machine, the end-user will still be able to run a report and browse through the report output pages. The problem or effect will only show when the user attempts to print a report output page. It is unfortunate that such a CAB file is required for print precision, the source of the problem lies in the page setup mechanisms of Internet Explorer version 6. In Internet Explorer version 5.5, Microsoft® did support page setup features in the registry system, but in version 6 this features became obsolete for some mysterious reasons. The CAB file is some sort of patch or service pack to correct this printing problem that exists in IE 5.5 and 6 (more on this problem in Part II of this article).
Now, we are ready to run the ASPSample demo application. To start, activate the Omega 13 ... Sorry, I meant to say the Internet Explorer (version 5.5 or above if possible). In the URL address bar of Internet Explorer enter the following text "http://local_server_name/ELSASPSample/MainPage.htm" where local_server_name is your local server's name, and click the Enter-key. This will display the MainPage.htm web page shown in Figure 1.10 below:
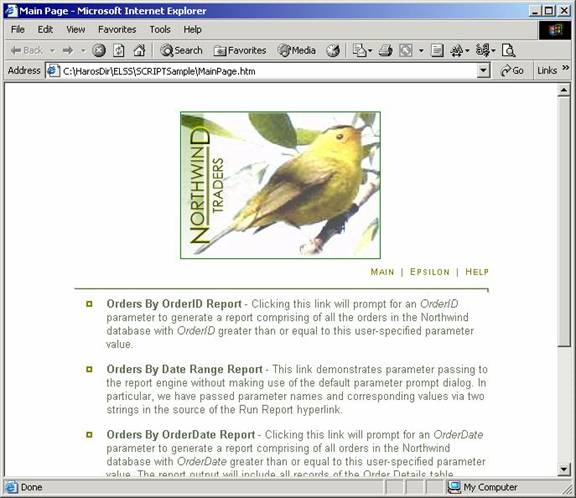
Figure 1.10. Showing the start page of the ASPSample web demo in the IE web browser
This page is essentially part of the sample application and provides the link to the reports listed under the Epsilon-Logic Systems version of the Northwind logo image. For example, click the Orders By OrderID Report link to run the report for the sales orders that exist in the MS-Access database Northwind.mdb.
Looking at Figure 1.11 we observe two HTML frames, namely a top frame and a bottom frame that contains toolbar buttons. The bottom frame consists of the following controls:
Run button, to re-run the report generation process,
Stop button, to stop an active report generation process,
First button, to jump to the first page of the report output,
Previous button, to jump to the previous page of the report output,
Next button, to jump to the next page of the report output,
Last button, to jump to the last page of the report output,
Print Preview button, to print preview the current page,
Print Current Page button, to print the current page,
Main Window button, to get back to the MainPage.htm web page.

Figure 1.11. Showing the two-framed web page of the Orders Reports generator in the IE web browser
When running the Orders By OrderID Report from the MainPage.HTM, a parameter dialog prompts for an OrderID value. Enter some value, for example 10300, in the Order ID textbox and click on the Run button. The sample is set to query all the orders with OrderID greater than the entered value, so the result will be all the orders above 10300, as shown in Figure 1.12 below:
Figure 1.12. Showing the first page of the report
output for orders above 10300
The result will automatically display the first page after the report output generation. To navigate through the pages you may use the First, Previous, Next and Last buttons. To print the current page, using precision printing, click on the Print Current Page button. To print preview the current page click on the Print Preview button, this will open the print preview window with zoom features as shown in Figure 1.13.

Figure 1.13. Showing the Print Preview with 500% zoom
So How Does It All Work?
For several decades, desktop PC had a lot of things done for us with great ease and flexibility. When turning to the Internet centralized server-based platform, things become really different. Business processes that were impossible on desktop based isolated PC, are extremely obvious and simple on Internet, while other things such as large data processing being for granted procedures on desktop PCs are almost impossible on the Internet. One particular misfortune of this change of faith is large data retrieval and presentation from a centralized database across the Internet. Historically, the flat file database systems were replaced with the relational data base systems, the future seems to be going towards hierarchical or dimensional database systems. The web report technology presented in ELS-Script® is one step ahead from all the data retrieval and report tools available on the current market (including the new Microsoft® SQL Server Report Services technology).
.
When using the ELSRepGenE.DLL report engine in an ASP application, the client browser first makes a request calling the GenerateReport API function to generate the report output passing query parameters. As a result the report generation process is triggered and the output generated in STG-files on the web server. The report engine instance keeps the references to this STG-file after the report generation, so that the individual report output pages may be browsed or viewed via calls to the GetPageContent API function. In the example of Figure 1.14, the report output is already generated and has N pages, and the GetPageContent(j) is retrieving the j-th page to be put in the ASP Response object, in this way sending the requested page to the client web browser.
Now since the report generation occurs entirely on the web server side, there is no need to spread the bandwidth of the connection to access the data across the web. Instead the data is prepared in the selected presentation form and the pages of this presentation are fetched via Request and Response ASP objects.
Figure 1.14. Showing the report generation and page retrieval processes
How Do I Deploy My Reports on
the Web?
The procedure of deployment of the ELSRepGenE.DLL report engine on the web is very similar to the deployment on your local Intranet web server. In particular, the firs thing that needs to be done is install the ELSRepGenE.DLL component on the web server and register into the web server's system registry. Now, this poses a problem if the web server that you are using is not owned by your company. For example, what if you are using one of these commercial web host service providers, who are reluctant to deploy any third party component on their web servers shared among their customers. This indeed is a problem, and we are pursuing all commercial web host service provider companies to deploy our report engine. As of the moment we have a list of providers that have already deployed the engine and will provide this additional service along with web site hosting for an additional few dollars monthly fee. Sooner or later, almost all the providers will deploy this low resource consuming report engine. If your web host service provider has problems deploying our report engine, please contact us sending and e-mail to support@epsilon-logic.net, and we will refer you to another provider who is willing to deploy your web reporting solution.
Besides the installation and deployment of the ELSRepGenE.DLL report engine, the rest of the setup tasks are exactly the same as outlined in section "Running the ASP Demo on Your Local IIS Server". Except instead of you performing all of these tasks, all you need to do is upload the entire contents of ASPSample directory into your web site's www folder, and your provider must do the rest of the server-side setup and security configurations for you. Perhaps for tighter security reasons you might want to use the SetStoragePath API function of the ELSRepGenE.DLL component to set a temporary storage path where the STG-files will be generated. By default this storage path is set to the Bin\Temp subdirectory where all the binary REP report files reside.
We also like to inform those who are interested in purchasing new web hosting plan for the purpose of the ELSRepGenE.DLL report engine deployment, to consider our Enterprise Web Reporting Solution hosting plan. For further information about these services please visit http://www.elsscript.net.
Walk Me Through the Code
In this section we will describe all the programming details of the ASPSample demo application, so that by the end of this part of the article, you will understand enough to be able to modify or extend the source code to your particular custom requirements.
To start we should observe that the MainPage.HTM has the following hyperlinks from where you can run the reports:
Orders By OrderID Report
Orders
By
Orders
By OrderDate Report
All
Invoices Report
Invoice
Sales Summary With Charts
These hyperlinks essentially are defined by HTML anchors with code segments similar to the following:
<a class="replisthd" href="ReportViewer.asp?RepFile=/REPFolder2/OrdersByOrderID.rep&DBIndex=0">
Orders By
OrderID Report</a>
In particular, the main page seems to organize our sample reports into a single user interface, but in actuality this is just a choice, and that the actual report files may be organized into separate folders, and may be driven by entirely separate databases.
The general syntax of the anchor hyperlinks must be as follows:
href="ReportViewer.asp?RepFile=report_pathfilename.rep&ParamNames=param_names_array
&ParamValues=param_values_array&DBIndex=index_value"
where report_pathfilename is the relative path and filename of the REP-file, the param_names_array is a ";" delimited sequence of parameter names that are defined inside the ELS-file corresponding to the REP-file, the param_values_array is a ";" delimited sequence of parameter values corresponding to these parameter names, and index_value is the enumeration value of the database that is used in your custom web application.
In general, these parameter names, parameter values and the database index may depend on your custom requirements and the particular parameters you have defined in your report script. We will describe more details about these factors shortly, but first let us take a look at the ASP script code included in the Global.ASA file of the web sample application. The following code is triggered every time an instance of the client web browsers opens a web page from the web site:
Sub
Session_OnStart
Session("PageCount")
= 1 '
to handle the report output page count
Session("CurrPage")
= 1 '
to keep track of the current output page
Session("InGeneration")
= 0 ' in
generation process or not
Session("RepIndex")
= 0 '
the index of the report file
Session("EngineConnected")
= False ' engine connected or not
Session("ReportInitialized")
= False ' report initialized or not
Session("RepName")
= "" ' to pass the report filename
Session("ParamName")
= "" ' to pass the parameter name
Session("DlgContent")
= "" ' to pass the parameter dialog's content
Session("ShowParamsDialog")
= 1 ' show
parameter dialog or not
Session("ParamNames")
= "" ' to pass the parameter names array
Session("ParamValues")
= "" '
to pass the parameter values array
Session("
Session("ParamsObject")
= Null ' to handle the parameter object used in report
' constant data access connections for
multiple databases
Session("ConnStr0")
= "Provider=Microsoft.Jet.OLEDB.4.0;" & _
"Persist Security
Info=False;Data Source=" & Server.MapPath(".")
& _
"\Database\Northwind.mdb"
Session("ConnStr1")
= "Provider=Microsoft.Jet.OLEDB.4.0;" & _
"Persist Security
Info=False;Data Source=" & Server.MapPath(".")
& _
"\Database\AnotherDB.mdb"
' ... add more ConnStr constants here as
required ...
' puting the connection string
information in global.asa will make it secure,
'
and to select a defined particular connection, pass the DB index number from
'
the main HTML page as a ReportViewer.asp parameter
Session("ConnectString")
= Session("ConnStr0")
Set Session("ReportEngine")
= server.CreateObject("ELSRepGenE.ELSReportEngine")
Set Session("Report")
= server.CreateObject("ELSRepGenE.ELSReport")
If IsObject(Session("ReportEngine")) Then
Dim objFSO,
objFile, objFileItem, objFolder, objFolderContent, TempDir
Session("ReportEngine").Initialize
' define the
report engine's storage path
TempDir = Server.MapPath(".")
& "\Bin\Temp\"
Session("ReportEngine").SetStoragePath
TempDir
Set
objFSO = server.CreateObject("Scripting.FileSystemObject")
Set
objFolder = objFSO.GetFolder(TempDir)
Set
objFolderContent = objFolder.Files
' attempt to
delete all the content of the storage path directory
For Each
objFileItem In objFolderContent
On Error
Resume Next
objFSO.DeleteFile TempDir &
objFileItem.Name
If
Err.Number <> 0 Then
Err.Clear
End If
Next
End If
End
Sub
In particular, in this Session_OnStart event we create the ELSReportEngine and ELSReport objects and initialize the report engine and all global session variables. Observe in this initialization code that we have defined two database connection strings ConnStr0 and ConnStr1. In general, you may want to define more such connections as needed, and when applying you will need to set the ConnectString variable from the proper web page to one of these pre-defined connection string constants.
Note that we could have chosen to pass the entire data access connection string from the calling user interface web page, but for the sake of security, we chose to pass the DBIndex index instead, while the actual mapping of the connection string will depend on the definitions in the Global.ASA page.
Therefore, when customizing this server-based web application for your web report deployment, these database connections strings are one of the important factors that you will need to modify. In particular, if you are using only one database for all of your reports, then all you need to define is the ConnStr0 variable's value, and there is no need to specify the DBIndex index in your anchor hyperlinks.
The rest of the code in the Global.ASA page must be kept the same, and therefore, the only other issues that you need to address in your custom report solution deployment are the creation of your custom reports and putting the corresponding compiled REP-files in the proper folders, and then define the anchor hyperlinks with the proper calls to the ReportViewer.ASP page, together with the correct path to the REP-files and other report parameters.
So what happens when the user clicks on a report in the MainPage.HTM web page? For example, if the user clicks on the Orders By OrderID Report link, which has the following HTML anchor code:
<a class="replisthd" href="ReportViewer.asp?RepFile=/REPFolder2/OrdersByOrderID.rep&DBIndex=0">
Orders By
OrderID Report</a>
The ReportViewer.ASP page is called with parameters:
RepFile = "/REPFolder2/OrdersByOrderID.rep",
DBIndex = 0,
Looking over the code in the ReportViewer.ASP page, observe that this page has a HTML part consisting of two HTML frames, as is explicit in the following code segment:
<frameset
name="frmSet" rows="*,30" id=frmSet LANGUAGE=javascript border="0">
<frame name="main" scrolling="auto" src="RGOutput.htm"
noresize>
<frame name="footer" scrolling="no" noresize
src="RGController.asp"
style="border-top:lightgrey 1px solid" marginheight="2" marginwidth="5" target="main">
<noframes>
</noframes>
</frameset>
The sources of these two frames are RGOutput.HTM and RGController.ASP web pages. Therefore both of these pages are called when the ReportViewer.ASP page is loaded. During the load of this page, the report is loaded via the following code line:
bLoadSuccess
= LoadReport()
This of course calls the LoadReport function defined by the following VB Script code segment:
Function
LoadReport()
On Error Resume Next
Session("Report").ReportFileName
= Server.MapPath(".") & Request.QueryString("RepFile")
If Err.Number <> 0 Then
Response.Write "Failed to load
report: " & Server.MapPath(".") & _
Request.QueryString("RepFile")
Err.Clear
LoadReport = False
Exit Function
End If
LoadReport = True
End
Function
In this LoadReport function, the path/filename is passed to the ELSReport object instantiated in the report engines memory space for the current session.
' set the global session variable RepName to the RepFile parameter
passed to this page
Session("RepName") =
Request.QueryString("RepFile")
' use the GetParams() report engine API
function to retrieve report parameters
'
from the REP-file
Set Session("ParamsObject") =
Session("Report").GetParams()
Session("ParamCount") =
Session("ParamsObject").Count
Dim nRealCount, nSize, lType
nRealCount = 0
lType = 1
For I = 0 To Session("ParamCount") - 1
nSize = Session("ParamsObject").Type(I,
lType)
nRealCount = nRealCount + nSize
Next
Session("ParamCount") =
nRealCount
' construct content to dynamically create
the parameter dialog
Dim nCurrTop, nCurrIndex
Dim sDlgOuterHTML
sDlgOuterHTML = "<INPUT
id=btnRun type=button value=Run name=btnRun
style='BACKGROUND-COLOR:gainsboro;Z-INDEX:
100; LEFT: 137px; WIDTH: 70px; FONT-FAMILY:
sans-serif;
POSITION: absolute; TOP:" & (Session("ParamCount")*30 + 15) &
"px' width='70'
LANGUAGE=javascript onclick='return fnCloseDialog(1)'>" & _
"<INPUT
id=btnCancel type=button value=Cancel name=btnCancel
style='BACKGROUND-COLOR:gainsboro;Z-INDEX:
101; LEFT: 215px; WIDTH: 70px;
POSITION:
absolute; TOP:" & (Session("ParamCount")*30 +
15) & "px' width='70'
LANGUAGE=javascript
onclick='return fnCloseDialog(0)'>"
Dim sOptions
sOptions = "2D Bar,3D Bar,2D
Line,3D Line,2D Area,3D Area,2D Step,3D Step,2D Pie"
nCurrIndex = 0
nCurrTop = 15
For I = 0 To Session("ParamsObject").Count -
1
nSize = Session("ParamsObject").Type(I,
lType)
For J = 0 To nSize - 1
sDlgOuterHTML =
sDlgOuterHTML & GetLabelOuterHtml(I, J, nCurrTop)
If Session("ParamsObject").Name(I)
= "MSChartType" And J = 0 Then
sDlgOuterHTML =
sDlgOuterHTML &
GetCtrlOuterHtml(nCurrIndex,
lType, nCurrTop,Split(sOptions,",",-1,1))
Else
sDlgOuterHTML =
sDlgOuterHTML &
GetCtrlOuterHtml(nCurrIndex,
lType, nCurrTop, Null)
End If
nCurrTop = nCurrTop + 30
nCurrIndex = nCurrIndex + 1
Next
Next
' It is assumed that the ParamNames
and/or ParamValues arrays must be empty
'
for the parameter dialog to show
If Request.QueryString("ParamNames")
<> "" Then
' if parameters are given do not
prompt the parameter dialog,
' simply pass these values to the
global session variables
Session("ShowParamsDialog") = 0
Session("ParamNames") =
Request.QueryString("ParamNames")
Session("ParamValues") = Request.QueryString("ParamValues")
Else
' otherwise prompt the dynamically
created parameter dialog
' for the user to enter the
required report parameters
Session("ShowParamsDialog") = 1
End If
' if DBIndex is not specified then use
the default database
If Request.QueryString("DBIndex") =
"" Then
Session("ConnectString") =
Session("ConnStr0")
Else
Session("ConnectString") =
Session("ConnStr"+Request.QueryString("DBIndex"))
' add more cases here if you have more
databases
End If
' pass the dynamically built content of
the parameter dialog page
Session("DlgContent") =
sDlgOuterHTML
In this code first the RepFile parameter's value is passed to the global session variable RepName, then a call is made to the report engine to retrieve the parameters from the report's REP-file. Subsequently, the global session variables ParamsObject and ParamCount are evaluated. Then the content of the ParametersDlg.HTM web page is constructed dynamically using this parameter information.
Now if the ParamNames parameter is not specified in the call to this ReportViewer.ASP page, the ShowParamsDialog global session variable is set to true, so that the ParametersDlg.HTM web dialog window will prompt automatically for the user to enter the required parameters of the report. Otherwise, this ShowParamsDialog variable is set to false and the specified parameter information is passed to the global session variables ParamNames and ParamValues.
Finally, the correct database connection is set via the DBIndex parameter. This later parameter is useful if you have several databases for each module of your custom web application. All you have to do is define all the data source connections strings in the Global.ASA file, and then pass the proper DBIndex value from your anchor hyperlink.
At this point, after the load of the ReportViewer.ASP page, the RGController.ASP page takes over the control of the application process. As a result of this, the following window_onload Java Script function gets executed:
function
window_onload() {
nCurrPage = 1;
nPageCount = 1;
frmParams.btnRun.disabled = true;
frmParams.btnStop.disabled = true;
frmParams.btnFirst.disabled = true;
frmParams.btnPrev.disabled = true;
frmParams.btnNext.disabled = true;
frmParams.btnLast.disabled = true;
//setTimeout("fnEnterParams()",
500);
if(fnEnterParams())
fnSubmitForm("run");
}
And in turn the fnEnterParams() function is called. This later function prompts the ParametersDlg.HTM web page as a web dialog with the content that was dynamically created and stored in the global session variable DlgContent.
The window_onload function also enables the Run, Stop, First, Previous, Next and Last buttons of the frmParams web form that is embedded in the HTML body of the RGController.ASP page. The content of this web form essentially is displayed at the bottom of the report viewer page, and consists of the following HTML code:
<FORM
language=javascript id=frmParams name=frmParams
onsubmit="return
frmParams_onsubmit()" action=RepGen.asp method=post>
<P
style="FONT-WEIGHT: normal; FONT-SIZE: 9pt; COLOR: white; FONT-FAMILY: MS
Sans Serif">
<INPUT
language=javascript onmouseup="fnShowBtn('Raise')" class=btnFlat
onmousedown="fnShowBtn('Inset')" id=btnRun
onmouseover="fnShowBtn('Raise')"
style="BACKGROUND-IMAGE: url(images/run.bmp); WIDTH: 22px;
BACKGROUND-REPEAT: no-repeat;
HEIGHT: 22px" onfocus=blur() onclick="return
btnRun_onclick()" onmouseout="fnShowBtn('Flat')"
type=button name='btnRun"'>
<INPUT
language=javascript onmouseup="fnShowBtn('Raise')" class=btnFlat
onmousedown="fnShowBtn('Inset')" id=btnStop
onmouseover="fnShowBtn('Raise')"
style="LEFT: 314px; BACKGROUND-IMAGE: url(images/stop.bmp);
WIDTH: 22px; TOP: 16px;
HEIGHT: 22px" onfocus=blur() onclick="return
btnStop_onclick()"
onmouseout="fnShowBtn('Flat')" type=button
name=btnStop>
<INPUT
language=javascript onmouseup="fnShowBtn('Raise')" class=btnFlat
onmousedown="fnShowBtn('Inset')"
id=btnFirst onmouseover="fnShowBtn('Raise')"
style="BACKGROUND-IMAGE:
url(images/MvFirst.bmp); WIDTH: 22px; BACKGROUND-REPEAT: no-repeat;
HEIGHT: 22px" onfocus=blur() onclick="return
btnFirst_onclick()"
onmouseout="fnShowBtn('Flat')" type=button
name=btnFirst>
<INPUT
language=javascript onmouseup="fnShowBtn('Raise')" class=btnFlat
onmousedown="fnShowBtn('Inset')" id=btnPrev
onmouseover="fnShowBtn('Raise')"
style="BACKGROUND-IMAGE: url(images/MvPrev.bmp); WIDTH:
22px; BACKGROUND-REPEAT: no-repeat;
HEIGHT: 22px" onfocus=blur() onclick="return
btnPrev_onclick()"
onmouseout="fnShowBtn('Flat')" type=button
name=btnPrev>
<INPUT
language=javascript onmouseup="fnShowBtn('Raise')" class=btnFlat
onmousedown="fnShowBtn('Inset')" id=btnNext onmouseover="fnShowBtn('Raise')"
style="BACKGROUND-IMAGE: url(images/MvNext.bmp); WIDTH:
22px; BACKGROUND-REPEAT: no-repeat;
HEIGHT: 22px" onfocus=blur() onclick="return
btnNext_onclick()"
onmouseout="fnShowBtn('Flat')" type=button
name=btnNext>
<INPUT
language=javascript onmouseup="fnShowBtn('Raise')" class=btnFlat
onmousedown="fnShowBtn('Inset')" id=btnLast
onmouseover="fnShowBtn('Raise')"
style="BACKGROUND-IMAGE: url(images/MvLast.bmp); WIDTH:
22px; BACKGROUND-REPEAT: no-repeat;
HEIGHT: 22px" onfocus=blur() onclick="return
btnLast_onclick()"
onmouseout="fnShowBtn('Flat')" type=button
name=btnLast>
<INPUT
language=javascript onmouseup="fnShowBtn('Raise')" class=btnFlat
onmousedown="fnShowBtn('Inset')" id=btnPreview onmouseover="fnShowBtn('Raise')"
style="BACKGROUND-IMAGE: url(images/PrintPreview.bmp);
WIDTH: 22px; BACKGROUND-REPEAT: no-
repeat; HEIGHT: 22px" onfocus=blur() onclick="return
btnPreview_onclick()"
onmouseout="fnShowBtn('Flat')" type=button
name=btnPreview>
<INPUT
language=javascript onmouseup="fnShowBtn('Raise')" class=btnFlat
onmousedown="fnShowBtn('Inset')" id=btnPrint1
onmouseover="fnShowBtn('Raise')"
style="BACKGROUND-IMAGE: url(images/PrintOnePage.bmp);
WIDTH: 22px; BACKGROUND-REPEAT: no-
repeat; HEIGHT: 22px" onfocus=blur() onclick="return
btnPrint1_onclick()"
onmouseout="fnShowBtn('Flat')" type=button
name=btnPrint1>
<INPUT
language=javascript onmouseup="fnShowBtn('Raise')" class=btnFlat
onmousedown="fnShowBtn('Inset')" id=btnMainWindow
onmouseover="fnShowBtn('Raise')"
style="WIDTH: 80px; HEIGHT: 22px" onfocus=blur()
onclick="return btnMainWindow_onclick()"
onmouseout="fnShowBtn('Flat')" type=button
value="Main Page" name=btnMainWindow>
<INPUT
type=hidden name=Action STYLE='POSITION:absolute;left:-100in; TOP:-100in'>
<INPUT
type=hidden name=ParamValue STYLE='POSITION:absolute;left:-100in;
TOP:-100in'></P>
<INPUT
type=hidden name=ParamName STYLE='POSITION:absolute;left:-100in;
TOP:-100in'></P>
</FORM>
The fnEnterParams() function has the following code:
function
fnEnterParams() {
// get the parameter count
sParamCount = document.getElementById('paramCount').innerText;
var nNumParams = parseInt(sParamCount);
if(nNumParams > 0)
{
// check if the parameters dialog
must be prompt or not
sShowDlg =
document.getElementById('ShowParamsDialog').innerText;
var nShowDlg = parseInt(sShowDlg);
if (nShowDlg != 0)
{
// prepare the parameter
dialog by passing the dlgContent value and display it
var
vArgs = new Array(2);
vArgs[0] =
document.getElementById('dlgContent').innerHTML;
dlgHeight =
Math.min(nNumParams * 30 + 80, 500);
nResult =
showModalDialog("ParametersDlg.htm", vArgs,
"center=yes;help=no;dialogWidth='320px';status=no;
dialogHeight='"
+ dlgHeight +"px'" );
if (nResult == 1)
{
frmParams.ParamName.value
= vArgs[0];
frmParams.ParamValue.value
= vArgs[1];
}
delete vArgs;
return nResult == 1;
}
else
{
// if parameter names and values
where specified in the main hyperlink
// then pass these values
to the frmParams variables for further processing
frmParams.ParamName.value
= document.getElementById('ParamNames').innerText;
frmParams.ParamValue.value
= document.getElementById('ParamValues').innerText;
}
}
return true;
}
This function first checks the parameter count, and if this count is non-zero, then the parameter dialog will prompt, provided the ShowParamsDialog variable's value is non-zero. Otherwise, it will pass the ParamNames and ParamValues values to the corresponding web form's variables, for further processing.
Getting back to the window_onload function, observe that the process continues by calling the fnSubmitForm() function with a value of "run" passed as an argument. This later function has the following code:
function
fnSubmitForm(sAction) {
// initialize the currentpage variable
nCurrPage = nPageCount = 1;
// set the enable/disable of the
navigation buttons
fnSetNavButtons();
frmParams.btnRun.disabled = true;
frmParams.btnStop.disabled = false;
// update the IE status bar via cookies
oInterval = window.setInterval("fnCheckPageCountResponse()", 300);
window.status = "Generating
Report: " +
document.getElementById("repName").innerText
+
" Please wait...";
// set the action and submit the web form
with target RepGen.asp page
frmParams.Action.value = sAction;
frmParams.submit();
}
The fnSubmitForm function eventually calls the execution of the main ASP code included in the RepGen.ASP page. It begins by first checking whether instances of ELSReportEngine and ELSReport are created. If such objects exist, then a call is made to the ConnectEngine function passing the active connection string as an argument. This is shown in the following code segment of the RepGen.ASP file:
'
check if ELSReportEngine and ELSReport object instances are created
If
IsObject(Session("ReportEngine")) And IsObject(Session("Report")) Then
sConnStr = Session("ConnectString")
' call the ConnectEngine function passing
the connection string to the report engine
Session("EngineConnected") =
ConnectEngine(sConnStr)
End
If
The ConnectEngine
function actually creates an
Function ConnectEngine (sConnString)
On Error Resume Next
ConnectEngine = False
If Session("EngineConnected") Then
ConnectEngine = True
Else
' create an instance of connection
object
Set Session("
If Err.number <> 0 Then
Response.Write "Failed to create
ADODB Connection object on the server."
Err.Clear
Else
If IsObject(Session("
' open the connection
Session("
If Err.Number
<> 0 Then
Response.Write
"Failed
to find database on the server."
Session.Abandon
Else
' pass the
connection object to the report engine
If
Session("
Session("
Session("ReportEngine").Connection
= Session("
ConnectEngine
= True
End if
End If
End If
End If
End If
End
Function
The process in RepGen.ASP file continues by performing various operations based on the action selected by the user in the report viewer page. This is outlined in the following code segment:
If
Session("EngineConnected") Then
' if the action is the initial execution
of a report or the rerun via the Run button
' of the report viewer page, then
initialize the report and call the GenerateReport function
If Request.Form("Action") =
"run" Or
Request.Form("Action") = "re-run" Then
Session("ReportInitialized") =
InitReportInfo
If Session("ReportInitialized") Then
GenerateReport
End If
ElseIf Request.Form("Action") =
"stop" And
Session("InGeneration") = 1 Then
Session("ReportEngine").Stop
Response.Write "Report
generation is terminated by user request."
Else
Select Case Request.Form("Action")
Case "first"
Session("CurrPage") = 1
Case "prev"
If Session("CurrPage") > 1
Then
Session("CurrPage") =
Session("CurrPage") - 1
End If
Case "next"
If Session("CurrPage") <
Session("PageCount") Then
Session("CurrPage") =
Session("CurrPage") + 1
End If
Case "last"
Session("CurrPage") =
Session("PageCount")
End Select
sContent = Session("ReportEngine").GetPageContent(Session("CurrPage"))
If Err.Number <> 0 Then
Response.Write "Failed to obtain
the
" & Session("CurrPage")
&
" page of report."
Err.Clear
Else
Response.Write sContent
Response.Write
GetPrintSettings()
End If
End If
End
If
Observe that the Request.Form refers to the RGController.ASP page, in which the frmParams.Action.value parameter is set to one of the following values:
"run" if the user has submitted the initial parameters dialog,
"re-run" if the user has called the parameters dialog in report viewer page and then submitted
this dialog,
"stop" if the user has clicked on the Stop button to halt an active report generation process,
"first" if the user has clicked on the First button,
"prev" if the user has clicked on the Previous button,
"next" if the user has clicked on the Next button,
"last" if the user has clicked on the Last button,
Now, when this value is "run" or "re-run", then the process first initializes the report object by calling the InitReportInfo function, and if successful, it continues with the actual report output generation via the GenerateReport function call.
Now what the InitReportInfo essentially does is first to parse the ParamName and ParamValue strings, splitting the ";" delimited strings into actual arrays. Then using these arrays, it loops over all the parameters of the report and evaluates them with the values specified by the user.
Function
InitReportInfo
On Error Resume Next
' if there are report parameters split
the ParamName and ParamValue into array objects
If Session("ParamCount") > 0
Then
Dim arrParamValues, arrParamNames
arrParamValues =
arrParamNames =
For I = 0 To Session("ParamCount") - 1
' evaluate the report
parameters via the Param API function of report object
Session("Report").Param(arrParamNames(I))
= arrParamValues(I)
If Err.Number <> 0
Then
Response.Write "Failed to set
report parameter value: " &
arrParamNames(I)
Err.Clear
InitReportInfo =
False
Exit Function
End If
Next
End If
' find and pass the target browsers URL
via the SetBaseURLPath API function of report engine
sBaseAddr = "http://" &
Request.ServerVariables("SERVER_NAME") & _
Request.ServerVariables("PATH_INFO")
sRepPath = Session("RepName")
sRepPath = Left(sRepPath,
InStrRev(sRepPath, "/", -1, 1))
sBaseAddr =
Left(sBaseAddr,InStrRev(sBaseAddr, "/", -1, 1)) & sRepPath
Session("ReportEngine").SetBaseURLPath
sBaseAddr
InitReportInfo = True
End
Function
This is illustrated at the beginning part of the InitReportInfo function's code above. The later part of this same code segment, continues with the derivation of the report's base URL path and passing it to the report engine via the SetBaseURLPath API function. This base URL will serve the web browser to locate all the dependencies for the report output of a particular report. Such dependencies include images, cascaded style sheets, as well as other data or format related files used in the report.
The actual report output generation process is triggered via the GenerateReport function, which has the following ASP code:
Sub
GenerateReport
On Error Resume next
Session("InGeneration") = 1
lRes = -1
Session("PageCount") = 1
' call the GenerateReport API function of
the report engine passing
'
the report object as argument
lRes = Session("ReportEngine").GenerateReport(Session("Report"), ELS_HIDE)
if lRes < 0 Then
Response.Write "Generation
Error:
" & Err.Description
Err.Clear
Session.Abandon
Exit Sub
End If
Session("InGeneration") = 0
Response.Cookies("PageCount") = lRes
Session("PageCount") = lRes
' after successful generation get the
content of the first page of the output
' via the GetPageContent API function of
the report engine
sContent = Session("ReportEngine").GetPageContent(1)
If Err.Number <> 0 Then
Response.Write "Failed to obtain
the fisrt page of " &
Session("Report").ReportFileName
& "."
Err.Clear
Else
Session("CurrPage") = 1
' return the content of the output
page to the web browser
Response.Write sContent
' also return the default print
settings of the report hidden in a <DIV>-element
Response.Write GetPrintSettings()
End If
End
Sub
In this code the GenerateReport API function of the report engine is used to generate the report behind the screen on the web server across the web. Then the content of the first page of the report output is retrieved via the GetPageContent API function. This content is then wrapped into the ASP Response object along with the default print settings of the report hidden inside a HTML <DIV> tag (see GetPrintSettings function in RepGen.ASP for further details). As a result of these operations, the client web browser will display the first page of the report output with the proper print settings.
To navigate through the other pages of the generated report output, the First, Previous, Next and Last buttons must be used. These will trigger actions with respective values of frmParams.Action.value, and for each such value the CurrPage global session variable is updated, and the content of the output page is retrieved via the GetPageContent API function to be returned via ASP Response object to the client's web browser (see Figure 1.14 for more details on the architecture of the report engine).