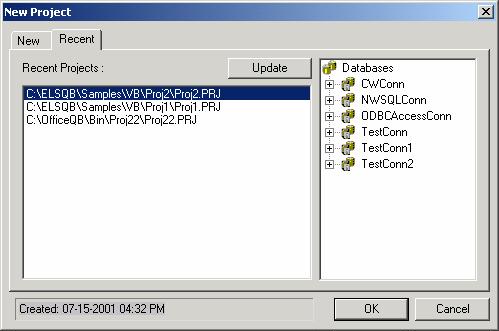
Figure 2. Showing the New Project dialog with the Recent tab selected
Creating a QB-Project
To start with
Office-QB
application, you will need to create a QB-project (Query Builder
project). A QB-project will organize your work into a user-specified
directory on your system. In this way saving you time and effort by avoiding the
undesirable alternative of query files scattered all over your system.
To create a project run the
Office-QB
application, and from the File
menu select New Project.
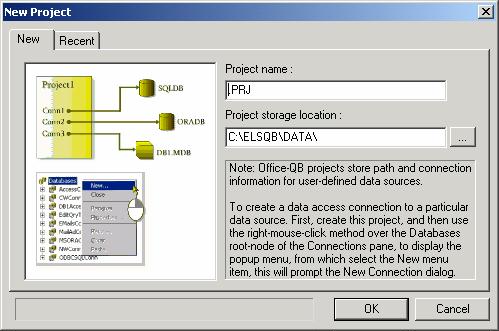
This will open the New Project
dialog (see Figure 1 for more details),

In the default New tab of this dialog, enter the Project name field and set the Project storage location via the button next to the edit-box. Note that this 3-dot button will open the standard Windows Browse for Folder dialog, in which you may select a path for project storage files. After entering the project name and path, click on the OK button to create the project. This will display the project as an MDI child window in the main window of the Office-QB application, with the Connections pane containing only the root node, namely the Databases node (note that the Connections pane is located on the upper-right corner of the main window).
The Recent tab-view
If you want to get back to an existing QB-project, you may
call the New Project
dialog just like the way you used in creating new project, but this time you
need to click on the Recent
tab of the dialog. In this case the dialog has the appearance displayed in
Figure 2 below:

Figure 2. Showing the New Project dialog with the Recent tab selected
Note that the Recent
tab of this dialog resembles a project explorer, in the sense that, when
selecting a recently created project, the project's content is displayed in the
tree-view control on the right side of the dialog. In this way you may explore
the project contents before opening it in the main window of
Office-QB. Note
that since the list of the Recent
tab is stored in the system's registry, sometimes the links of this
Recent Projects list-box need to be refreshed. This may be done via the
Update button.
To open an existing project, you may select the project from the
Recent Projects
list-box and then click the OK button.